In this article, we are exploring conditional execution flows. What is a code path? What is a conditional? What’s an if statement? These are the subject that we cover here.
As part of the beginner journey, we focus on the if-else selection statements LEGO® block, laying down the foundation for more advanced use-cases.
In this article, we are exploring conditional execution flows. What is a code path? How will we do that? These are the subject that we cover here.
As part of the beginner journey, we focus on the if-else selection statements LEGO® block, laying down the foundation for more advanced use-cases.
This article is part of a learn programming series where you need no prior knowledge of programming.
If you want to learn how to program and want to learn it using .NET/C#, this is the right place.
I suggest reading the whole series in order, starting with Creating your first .NET/C# program, but that’s not mandatory.
This article is part of a sub-series, starting with Introduction to Boolean algebra and logical operators.
It is not mandatory to read all articles in order, but I strongly recommend it, especially if you are a beginner.
If you are already reading the whole series in order, please discard this word of advice.
Conditional execution flow
In the article How to read user inputs from a console, we talked about the flow of a program, moving from the first instruction to the next.
Let’s call that linear execution flow.
Here, you will learn how to run only part of the code based on different values, leading to a more complex execution flow model.
By writing conditional code blocks, we can create a program that actually has more complex logic than what we programmed so far.
Our program will be able to do different things based on different runtime values, like user inputs.
Let’s now explore how to program that using C#.
Equality operators
Before we dig into the conditional blocks, we will visit two new operators to help us compare if two values are equal or not.
Those works with all primitive types like string and int, for example.
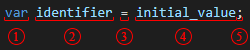
Equality operator ==
The equality operator == allows comparing if two values are equal.
The syntax is left_operands == right_operand and returns a Boolean value.
Tip: you can read this as left_operand is equal to right_operand.
Here is an example:
var left = "A";
var right = "B";
var result = left == right; // false
// ...
In the preceding code, since A is not equal to B, the result of the left == right comparison is false.
In the case of "A" == "A", the result would have been true.
We have one last operator to look into before exploring the if-else selection statements, the inequality operator.
Inequality operator !=
The inequality operator != is the opposite of the equality operator and allows comparing if two values are different (not equal).
The syntax is left_operands != right_operand and returns a Boolean value.
Tip: you can read this as left_operand is not equal to right_operand or left_operand is different than right_operand.
Here is an example:
var left = "A";
var right = "B";
var result = left != right; // true
// ...
In the preceding code, since A is not equal to B, the result of the left != right comparison is true.
More info: the inequality operator is syntactic sugar, equivalent to !(left == right).
This simplifies writing C# code a lot.
Other comparison operators exist, but let’s keep our scope narrow here and jump into the main subject instead.
if-else selection statements
The if-else selection statements are blocks of C# code that are executed conditionally based on a Boolean expression—a condition that evaluates to true or false.
In this section, we are exploring the following concepts:
- Statements block
- The
if statement
- The
else statement
- The
else if statement
Statements block
In C#, a statements block is delimited by { and }, like this:
// Code before the statement block
{ // Statement block start delimiter
    //
    // Code inside the block
    //
} // Statement block end delimiter
// Code after the statement block
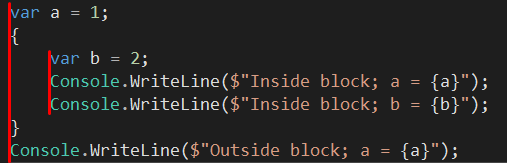
A block creates a sub-context that can access its parent context.
However, the parent context can’t access that sub-context.
Here is an example that illustrates this concept:
using System;

var a = 1;
{
    var b = 2;
    Console.WriteLine($"Inside block; a = {a}");
    Console.WriteLine($"Inside block; b = {b}");
}
Console.WriteLine($"Outside block; a = {a}");
Console.WriteLine($"Outside block; b = {b}"); // Error: The name 'b' does not exist in the current context
In the preceding code, the program can access the a variable from inside the statements block but cannot access the b variable from outside of it.
Because of that, if we execute the code, .NET will report an error telling us The name 'b' does not exist in the current context.
We use statements blocks extensively throughout the article, so don’t worry about it if you are unsure why you would write one.
Let’s explore why I indented the code inside the block before writing our first conditional code block using the if statement.
Indentation
Have you noticed the indentation added inside the statements block?
By convention, we add that indentation for readability.
That makes the different contexts (or nested-levels) line up vertically, like this:
In C#, we usually use 4 spaces to indent the code.
People may also use 2 spaces (not frequent in the .NET/C# world).
Some people also prefer to use tabs instead of spaces.
By default, Visual Studio and Visual Studio Code will translate a tab to N spaces automatically (default: 4), so you don’t have to type 4 spaces every time. One tab will do.
“Fun” fact: A tabs versus spaces war also exists where people prefer tabs over spaces or vice versa and argue that their way is the best over the other.
I personally use spaces, tried tabs, tried many techniques during the years, and realized that it does not matter much in the end.
If you are working in a team or an enterprise, there may well be existing guidelines around this.
Next, we explore the if statement.
The if statement
The if statement does literally what its English definition is: if the condition is true, then enter the statements block; otherwise, don’t.
This is where we begin to put that Boolean algebra to good use.
The syntax goes like this:
if (condition)
{
    // Do something when condition is true
}
Here is an example:
using System;
Console.WriteLine("Enter something: ");
var input = Console.ReadLine();
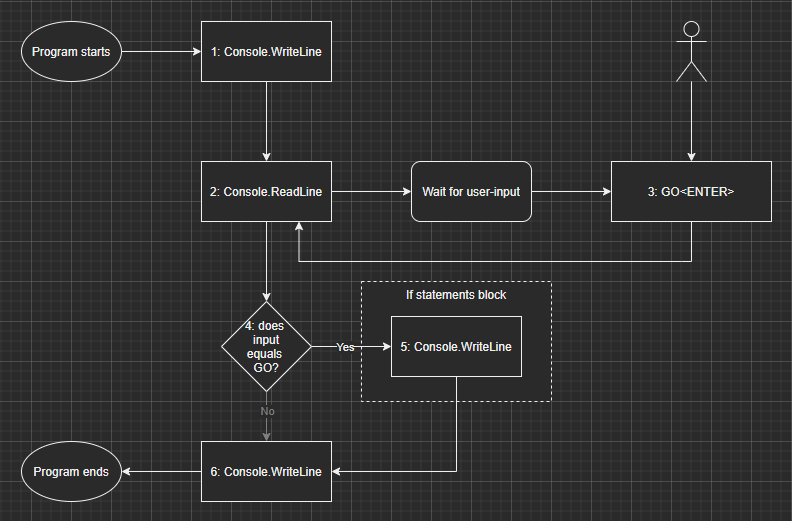
if (input == "GO")
{
Console.WriteLine("The user entered GO!");
}
Console.WriteLine("End of the program.");
In the preceding code, input == "GO" represents the condition that evaluates to a boolean result.
When running the program, if the user enters GO (uppercase), the program will print The user entered GO!. Otherwise, it will skip that code block.
Here is a running example:

As we can see from that recording, if we enter something other than GO, the program skips the statements block.
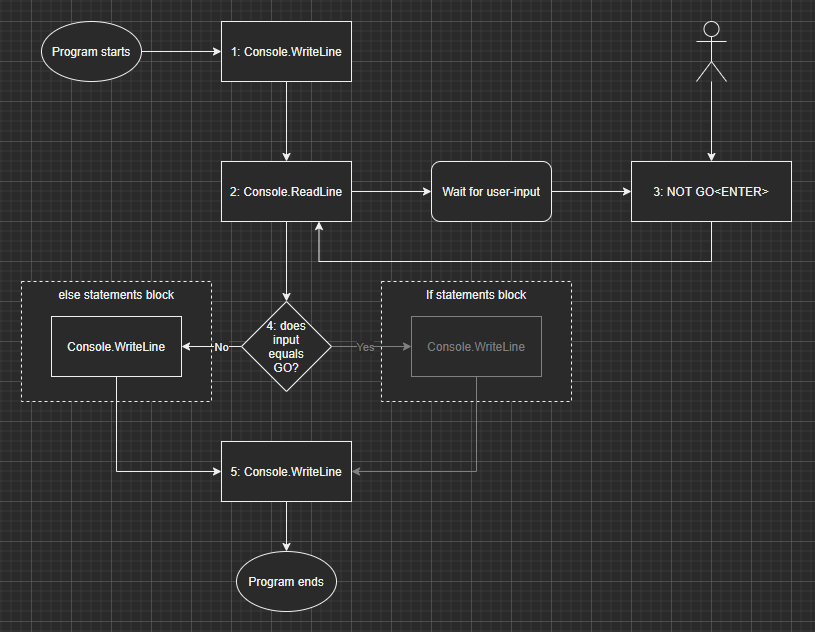
Here is the visual representation of this program flow when the user enters GO:
Here is the visual representation of this program flow when the user enters NOT GO:
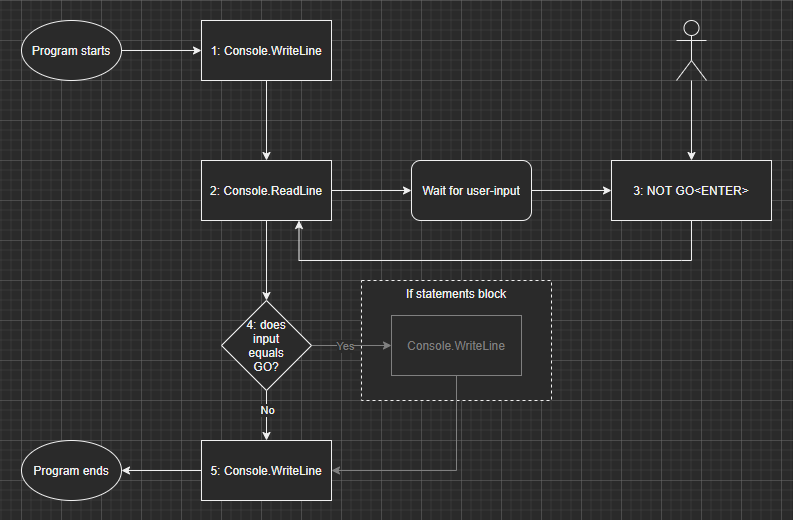
Note: in the preceding diagrams, the parts that are not executed are grayed out.
But what happens if we want something different to happen if the input is not GO while keeping this logic?
The else statement
The else statement must follow an if statement block (or an else if block; see below).
We can’t write an else block alone.
The else statements block is a fallback statements block that is executed when the if condition is evaluated to false.
The syntax goes like this:
if (condition)
{
    // Do something when condition is true
}
else
{
    // Do something when condition is false
}
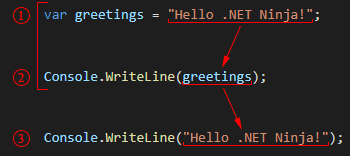
In the following example, we put that to good use and display Console.WriteLine("The user did not enter GO!"); when the input is different than "GO".
We could write this with two if statements or an if followed by an else statement.
Let’s start by the first option:
using System;

Console.WriteLine("Enter something: ");
var input = Console.ReadLine();
if (input == "GO")
{
    Console.WriteLine("The user entered GO!");
}
if (input != "GO")
{
    Console.WriteLine("The user did not enter GO!");
}
Console.WriteLine("End of the program.");
In this case, the preceding code would do the trick.
However, we can remove that second comparison input != "GO" by leveraging the else statement instead.
This will a) remove that comparison (slightly improve performance) and b) make our program more maintainable by removing the duplicated logic.
The alternative looks like the following:
using System;

Console.WriteLine("Enter something: ");
var input = Console.ReadLine();
if (input == "GO")
{
    Console.WriteLine("The user entered GO!");
}
else // Only this line changed
{
    Console.WriteLine("The user did not enter GO!");
}
Console.WriteLine("End of the program.");
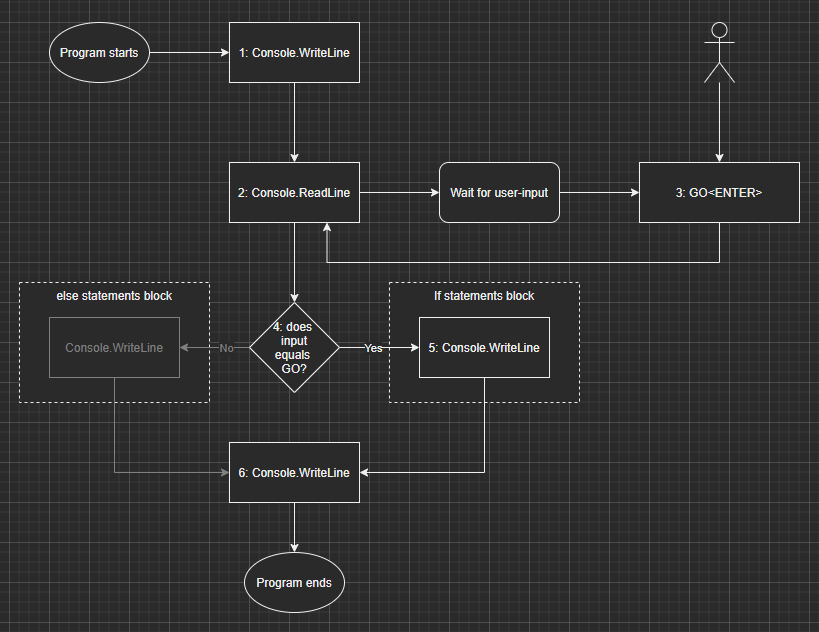
Running any of those two programs results in the following execution flow:
And there we go; we can now use the if and the if-else statements to control the program’s execution flow.
With them, we can execute only certain statement blocks based on runtime values, like values entered by the user.
Here is the visual representation of this program flow when the user enters GO:
Here is the visual representation of this program flow when the user enters NOT GO:
Note: in the preceding diagrams, the parts that are not executed are grayed out.
Ok, but what happens when we want to write a different message if the user enters SHOW ME?
The else if statement
The else if statement is a follow-up if statement if you wish.
As we saw in the preceding section, we can have two if statements back to back, but they are independent of each other.
On the other hand, the else if statement allows to add another conditional block after the if, but the condition is only be evaluated when the previous condition was evaluated to false.
We can chain as many else if statements as we need.
An else statement can optionally go last; after all else if blocks.
Here are a few examples of the syntax:
// if + else if
if (condition1)
{
    // ...
}
else if (condition2)
{
    // ...
}
// if + else if + else if
if (condition1)
{
    // ...
}
else if (condition2)
{
    // ...
}
else if (condition3)
{
    // ...
}
// if + else if + else
if (condition1)
{
    // ...
}
else if (condition2)
{
    // ...
}
else
{
    // ...
}
// if + else if + else if + else
if (condition1)
{
    // ...
}
else if (condition2)
{
    // ...
}
else if (condition3)
{
    // ...
}
else
{
    // ...
}
As mentioned, we can add as many else if blocks as needed.
Let’s now apply that to our problem: we want to write a different message if the user enters SHOW ME.
We could do this only with if statements, but as you can see below, it can get complicated:
using System;

Console.WriteLine("Enter something: ");
var input = Console.ReadLine();
if (input == "GO")
{
    Console.WriteLine("The user entered GO!");
}
if (input == "SHOW ME")
{
    Console.WriteLine("The user entered SHOW ME!");
}
if (input != "GO" && input != "SHOW ME") // <--
{
    Console.WriteLine("The user did not enter GO nor SHOW ME!");
}
Console.WriteLine("End of the program.");
By looking at the preceding code, we can see that the more logic we add, the more complex the else-like block becomes (the if line marked by a <-- comment).
Here we have two conditions (input == "GO" and input == "SHOW ME") so we must make sure that both are false before executing the default block (input != "GO" && input != "SHOW ME").
Tips: I strongly advise against writing that type of code as it can get out of hand very quickly.
In this case, seeing it firsthand will allow you to identify such code.
Always aim at simplicity and readability.
Let’s simplify that code using if—else if—else blocks instead:
using System;

Console.WriteLine("Enter something: ");
var input = Console.ReadLine();
if (input == "GO")
{
    Console.WriteLine("The user entered GO!");
}
else if (input == "SHOW ME")
{
    Console.WriteLine("The user entered SHOW ME!");
}
else
{
    Console.WriteLine("The user did not enter GO nor SHOW ME!");
}
Console.WriteLine("End of the program.");
We can notice two sets of changes:
- Replacing the second
if by an else if.
- Replacing the last
if by an else.
Here is a diff of those two listings, where the red lines are replaced by the green lines:
using System;

Console.WriteLine("Enter something: ");
var input = Console.ReadLine();
if (input == "GO")
{
    Console.WriteLine("The user entered GO!");
}
- if (input == "SHOW ME")
+ else if (input == "SHOW ME")
{
    Console.WriteLine("The user entered SHOW ME!");
}
- if (input != "GO" && input != "SHOW ME")
+ else
{
    Console.WriteLine("The user did not enter GO nor SHOW ME!");
}
Console.WriteLine("End of the program.");
As the preceding code block highlights, using if, else if, then else allowed us to get rid of the complex condition that negates the other two conditions.
This code is still simple, but if you think about adding more and more conditions, the last if would become very hard to maintain, error-prone, and hard to read.
Moreover, all conditions would be duplicated. Once for its own if block and negated for that last if.
Using an else statement just makes our life easier, so why not, right?
Anyway, running any of those two programs results in the following execution flow:
Now, let’s explore how the code is evaluated.
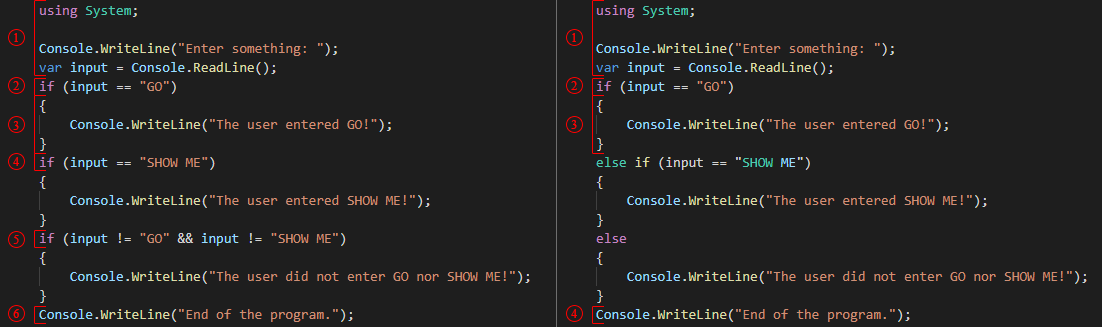
Those two small sets of differences change many things in the execution flow, as demonstrated in the following image:
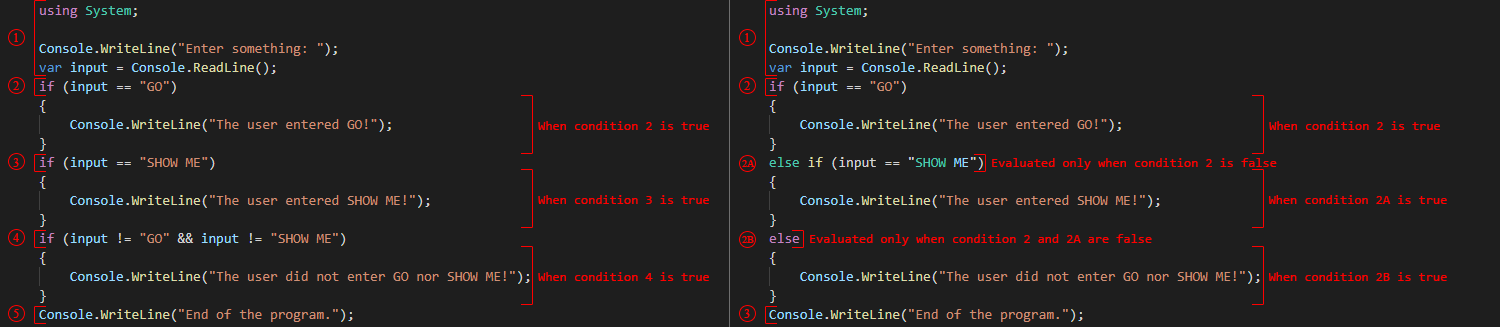
In the preceding image, we can notice that each condition is evaluated (on the left). In contrast, the conditions are evaluated only when the previous one was false (on the right).
This is the big difference between using if—else if—else or not.
To make it easier to understand, let’s compare the steps depicting the scenario of a user typing GO (input == "GO"):
The steps of the left listing goes like this:
- The first few lines are executed.
- The first
if is evaluated to true.
- The program writes a line to the console.
- The second
if is evaluated as false.
- The third
if is evaluated as false.
- The program writes a line to the console.
The steps of the right listing goes like this:
- The first few lines are executed.
- The first
if is evaluated to true.
- The program writes a line to the console.
- The program writes a line to the console.
In the right execution flow, only the first if is evaluated.
The program skips the evaluation of the else if statement and jumps over both the else if and else blocks.
Here is the visual representation of this program flow when the user enters GO:
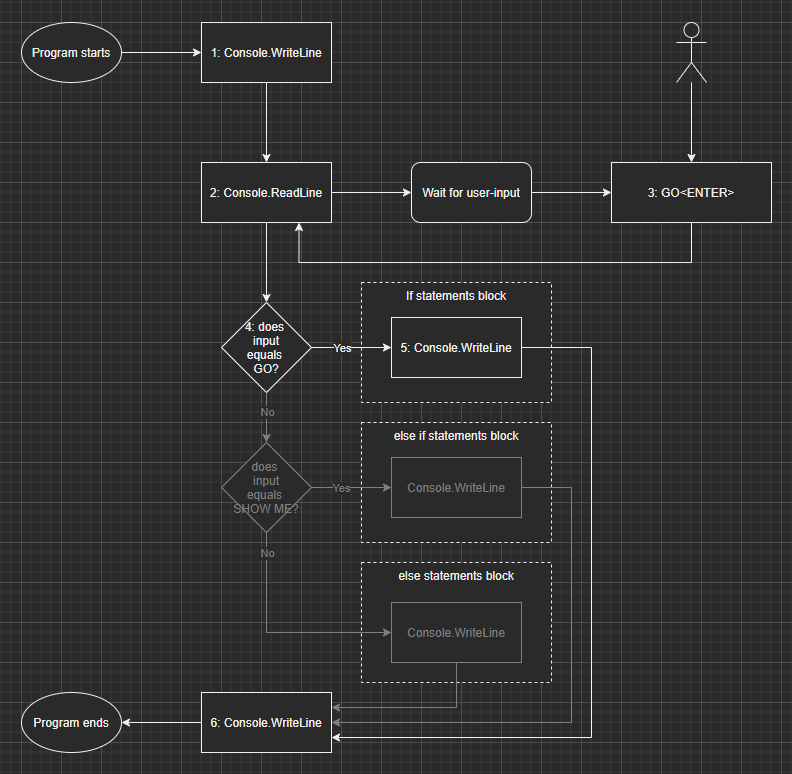
Here is the visual representation of this program flow when the user enters SHOW ME:
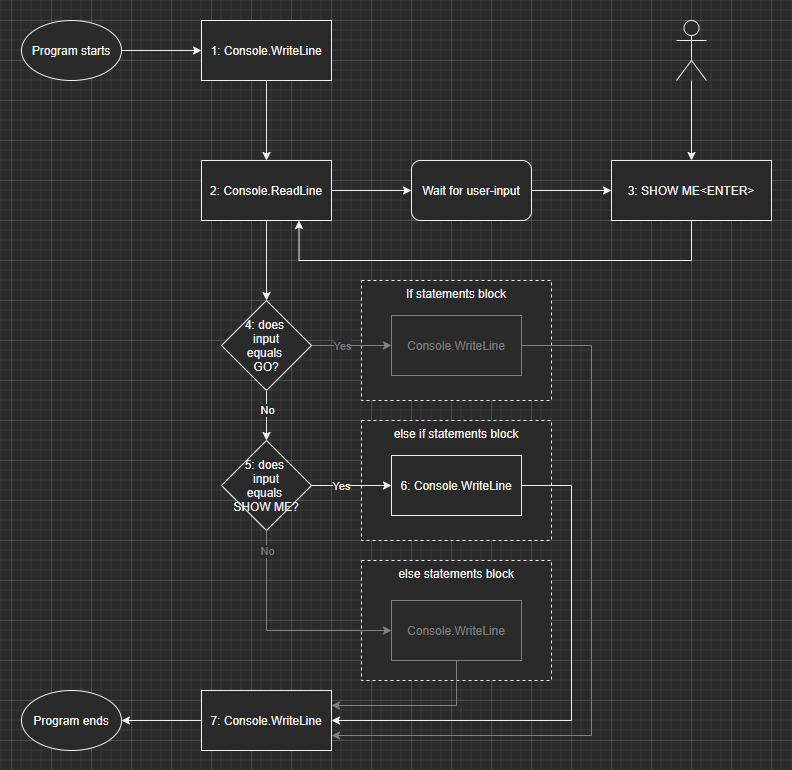
Here is the visual representation of this program flow when the user enters NOT GO:
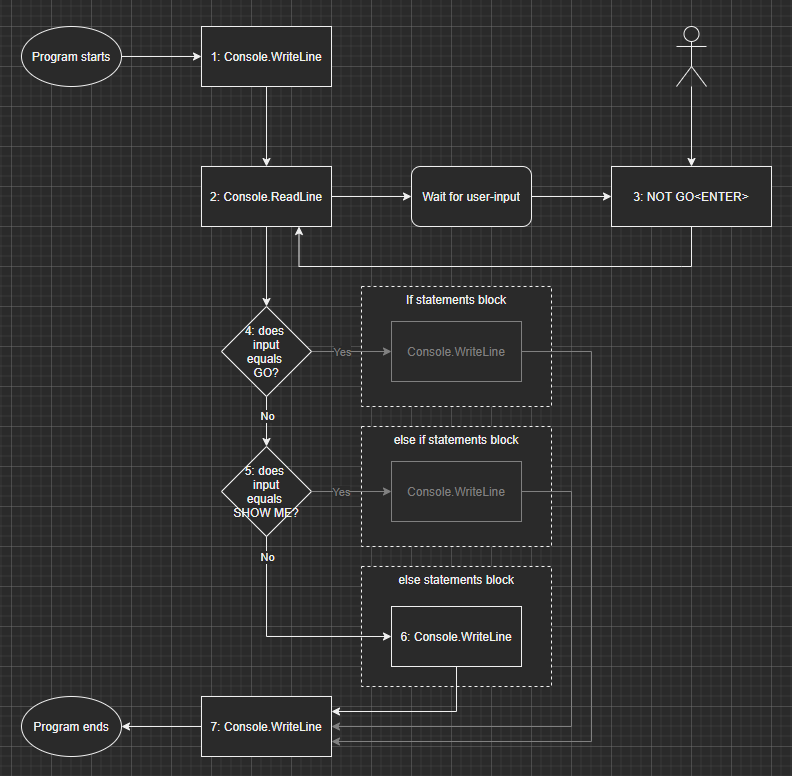
Note: in the preceding diagrams, the parts that are not executed are grayed out.
As you may begin to realise, if, else if, and else blocks are different ways to control the flow of execution of your programs.
Now that we explored that, it is time for you to practice.
Exercise
You must write a program that:
- Asks the user to input his first name.
- Asks the user to input his last name.
- If the user enters your first name and last name, write
Hey! that's me! to the console.
- If the user enters any other name combination, write
Hello, FIRST_NAME, LAST_NAME where FIRST_NAME and LAST_NAME are the names the user entered.
Here are a few optional hints in case you feel stuck:
Hint 1
If you don’t remember how to ask a user for his input, have a look at How to read user inputs from a console.
Hint 2
There are multiple ways of implementing this solution.
However, an if followed by an else block should be a good start.
Hint 3
The AND operator (&&) and the equality operator (==) will allow you to combine both conditions (first name and last name) into one.
Feel free to have a look at Introduction to Boolean algebra and logical operators if you need a reminder on logical operators.
Once you are done, you can compare with My Solution below.
My Solution
Program.cs
const string MyFirstName = "Carl-Hugo";
const string MyLastName = "Marcotte";

Console.WriteLine("What is your first name? ");
var firstName = Console.ReadLine();
Console.Clear();

Console.WriteLine("What is your last name? ");
var lastName = Console.ReadLine();
Console.Clear();

if (firstName == MyFirstName && lastName == MyLastName)
{
    Console.WriteLine("Hey! that's me!");
}
else
{
    Console.WriteLine($"Hello, {firstName}, {lastName}");
}
In the preceding code, I:
- Leveraged constants to make those values more obvious and easier to change (located at the top of the file). We explored constants in Introduction to C# constants.
- Used
if—else blocks, introduced in this article.
- Composed the conditional expression using the equality operator (
==) and the AND logical operator (&&), translating the English requirements to code: « If the user enters your first name and last name […] ».
- Employed string interpolation to format the output of the
else block. We explored string interpolation in Introduction to string interpolation.
As you may start to notice, the more we move forward, the more LEGO® blocks we can piece together, and the more complex the application we can build.
All the pieces are simple. The craft is about assembling them correctly.
The hardest part of programming is probably to teach our brain to think computer, allowing it to translate human-described requirements to code.
Tip: don’t think about the code itself; understand the human version of the problem instead, then try to fix it. This should help you.
Here is an alternative way you could have implemented the condition:
// ...
if (firstName != MyFirstName || lastName != MyLastName)
{
    Console.WriteLine($"Hello, {firstName}, {lastName}");
}
else
{
    Console.WriteLine("Hey! that's me!");
}
// ...
In the preceding code, the logic is inverted.
That condition could also have been simplified to:
// ...
if (!(firstName == MyFirstName && lastName == MyLastName))
{
    Console.WriteLine($"Hello, {firstName}, {lastName}");
}
// ...
If you are not sure how I was able to play with those conditions, we will explore that in a future article about common Boolean algebra laws.
Good job! You completed another small chapter of your programming journey.
Conclusion
In this article, we learned how to write code that gets executed only when certain conditions are met.
We learnt about the equality (==) and inequality (!=) operators.
Then we explored how to write if, else if, and else statements blocks to alter the linear flow of a program.
We also briefly covered code indentation as a standard way to improve the readability of your code.
Please leave your questions or comments below or drop me a Tweet.
Next step
It is now time to move to the next article:
Using the switch selection statement to simplify conditional statements blocks.
Table of content
Now that you are done with this article, please look at the series’ content.
| Articles in this series |
|
Creating your first .NET/C# program
In this article, we are creating a small console application using the .NET CLI to get started with .NET 5+ and C#.
|
|
Introduction to C# variables
In this article, we explore variables. What they are, how to create them, and how to use them. Variables are essential elements of a program, making it dynamic.
|
|
Introduction to C# constants
In this article, we explore constants. A constant is a special kind of variable.
|
|
Introduction to C# comments
In this article, we explore single-line and multiline comments.
|
|
How to read user inputs from a console
In this article, we explore how to retrieve simple user inputs from the console. This will help us make our programs more dynamic by interacting with the user.
|
|
Introduction to string concatenation
In this article, we dig deeper into strings and explore string concatenation.
|
|
Introduction to string interpolation
In this article, we explore string interpolation as another way to compose a string.
|
|
Escaping characters in C# strings
In this article, we explore how to escape characters like quotes and how to write special character like tabs and new lines.
|
|
Introduction to Boolean algebra and logical operators
This article introduces the mathematical branch of algebra that evaluates the value of a condition to true or false.
|
|
Using if-else selection statements to write conditional code blocks
You are here
In this article, we explore how to write conditional code using Boolean algebra.
|
|
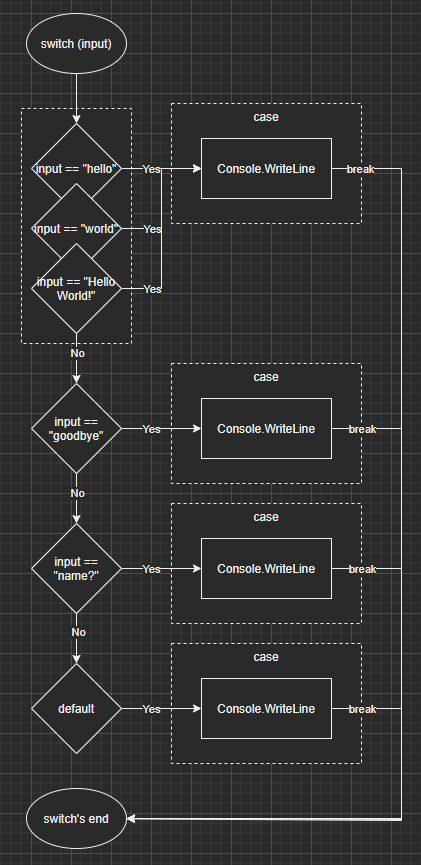
Using the switch selection statement to simplify conditional statements blocks
In this article, we explore how to simplify certain conditional blocks by introducing the switch statement.
|
|
Boolean algebra laws
This article explores multiple Boolean algebra laws in a programmer-oriented way, leaving the mathematic notation aside.
|
|
This is the end of this series
|
]]>