How to deploy and host a Jekyll website in Azure blob storage using a VSTS continuous deployment pipeline
Introduction and prerequisites

In this article series, we will create a continuous deployment (CD) pipeline using Visual Studio Team Services (VSTS) to deploy a Jekyll website to Microsoft Azure.
We will use Azure Blob Storage to store and host the files in the cloud, a Content Delivery Network (CDN) to deliver those files using a custom domain (with free HTTPS support). From Blob Storage, we will use the Static Website blade to configure a default page (index.html) and an error page (404 Not Found).
Azure Storage is a great, cost-effective, cloud storage offering from Microsoft (and no they don’t pay me to say that). For example, the images of this blog are delivered using a CDN and stored in Blob Storage on Azure. Moreover, as a developer, I enjoyed my experiences working with both Azure and Jekyll.
That said, I initially planned a single article, and once again it became very long very quickly, so I decided to split it into smaller chapters to make it easier to read. You can still consider the whole series to be a single long article. For example, when I decided to split the article, I had 55 screenshots; only that made the page ultra long.
The articles focus on the DevOps part of the equation and how to implement the cd pipeline, not really on Jekyll itself.
Here is a diagram that explains the whole idea:

- The top red part describes a user requesting a page and the CDN delivering it.
- The bottom blue part describes the Continuous Deployment pipeline; basically, what we will build in this article series.
Why Jekyll you might ask? Well, I did choose Jekyll because I built this exact pipeline for a website that I am creating; and wanted to share what I learned with you all!
At the day of the writing, the
Static Websiteoption is inPreview.
Table of content
| Articles in this series |
|---|
|
Introduction and prerequisites
You are here
In this article, we draw the plan and start the project. We will create a Jekyll website and create a VSTS project with a Git repository.
|
|
Part 1: The VSTS Build
In this article, we create the Jekyll build definition in VSTS.
|
|
Part 2: Create Azure Blob Storage, and configure static website
In this article, we create an Azure Blob Storage and we configure it to be ready for the deployment phase.
|
|
Part 3: The VSTS Release
In this article, we create the release definition. At the end, every code push in `master` will be deployed automatically.
|
|
Part 4: Configuring a Content Delivery Network (CDN)
Coming soon
In this article, we create the final piece of the puzzle, the way to access our Jekyll website using a custom domain over HTTPS. We also update the VSTS CD pipeline to account for this new addition.
|
|
Infrastructure as code
In this article, I give you the YAML code that you can use to automatically create the build definition by adding a `.vsts-ci.yml` file to your Jekyll website. This can replace "Part 1: The VSTS Build".
|
Difference with GitHub Pages (pros and cons)
For those who don’t know, GitHub has an offering that is called GitHub Pages. GitHub Pages allows a GitHub user to deploy a Jekyll website from a git repository. Then GitHub builds, deploys and hosts the Jekyll static website automatically for you. This blog uses GitHub Pages.
In this article, we will recreate that exact pipeline, but we will use different tools to do so.
Here are the pros and cons (if you find other pros and cons feel free to leave them in a comment):
Pros:
- No limitation on Gems or custom Ruby plugins, you can code whatever you want!
- Custom domains with HTTPS support (for free).
- You can use a private Git repository (also possible for free).
Cons:
- Compared to GitHub Pages, you need to setup the CD pipeline.
- The build and release time is slower since the Agent must install everything everytime you start a new build.
- That setup time is not needed on GitHub; they probably reuse pre-built agents.
- This is the downside of flexibility I guess.
- To be fair, at some point it may cost some money; if you get a lot of traffic, use a lot of storage or use too much VSTS build time. As of today:
- You have 240 minutes per month of free VSTS build time. You also have 5 free users with unlimited private Git repositories. See Visual Studio Team Services pricing for more information.
- General Purpose v2 (Blob storage) cost US $0.0208 per GB, per month, plus the transfer cost which is also ridiculously low. See Block Blob pricing for more information.
- The CDN cost is also super low, starting at US $0.087 per GB, per month. See Content Delivery Network pricing for more information.
That said, at the end of this article, you should end up with a serverless, geo-distributed website, fueled by a continuous delivery pipeline costing you from as low as free. Which is pretty wonderful in my opinion!
Prerequisites
In this article series, I will assume that readers know:
- Git basics like
clone,commitandpush. - How to use a terminal or the VS Code integrated terminal.
- Have an Azure account (trial or not) or be willing to create one.
- Have a VSTS account or be willing to create one.
If I missed something, feel free to leave a comment!
DevOps
Let’s resume: what do we want to achieve in this series, DevOps-wise?
We want to create an automated deployment pipeline for a Jekyll website: from code to cloud!
Prerequisite 1: Create a Jekyll website
The first step is to create a Jekyll website to deploy in Azure. I assume that you know Jekyll already if you don’t, fear not and keep reading, we won’t go deep into Jekyll so you should be fine (might take you a little more time, that’s all).
If you already have a Jekyll website you want to use, you can do that too. I’d recommend you take a look at how I named mine for future reference in the other articles, but besides that (and even then), feel free to jump to the next section.
After reading the entire series, you could try with another static website builder or even plain static website if you want; Jekyll is only a means to an end here. Personally, I may go Blazor on Azure, if I find the time!
The setup
Install Jekyll and Ruby
If you need to install Jekyll and Ruby, you should follow the official Jekyll installation guide to install all prerequisites.
Creating the website
To create a Jekyll website, follow those quick steps:
- Create directory (I called mine
JekyllOnAzure). - Initialize a Git repository there.
- Open a terminal in that folder (or open the folder in VS Code then use the integrated terminal).
- If you installed Jekyll on Ubuntu on Windows 10, type
bashto start a bash session.
- If you installed Jekyll on Ubuntu on Windows 10, type
- Type
jekyll new .(the.tells Jekyll to use the current directory instead of creating a new one). - Commit your changes (my commit message was
jekyll new).
And voilà! You got yourself a new empty Jekyll website.
To test if it works:
- Type:
jekyll serveorbundle exec jekyll serve. - Open a browser on the specified
Server address- From VS Code,
ctrl+clickon the link in the terminal to open it in your default browser.
- From VS Code,
From here, you can change the theme, add plugins, write pages and posts. This article does not cover Jekyll customizations; I leave you to build your own thing!
If you have a hard time executing this step, please refer to the official Quick-start guide or leave a comment and I will do my best to help you out.
Prerequisite 2: Create a VSTS/Git project
Now that we have a website to deploy, we need a VSTS project (and a git repo) to push our code to. If you don’t have a VSTS account, you can create one for free here: Visual Studio Team Services. This part should be very brief to complete.
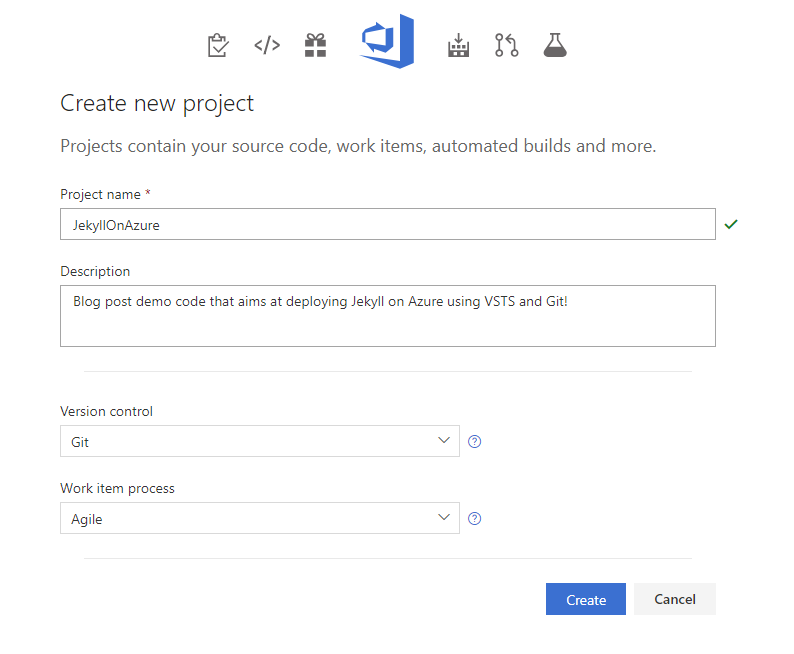
Create a VSTS project
In your VSTS account, create a new project and make sure to select Git in the Version control dropdown list.
I named my project JekyllOnAzure.
Push code to VSTS
Once the project is created, we need to push our Jekyll code to VSTS so we can build it there. After creating the project, you should be redirected to a “project summary” page that contains the link to your Git repository.
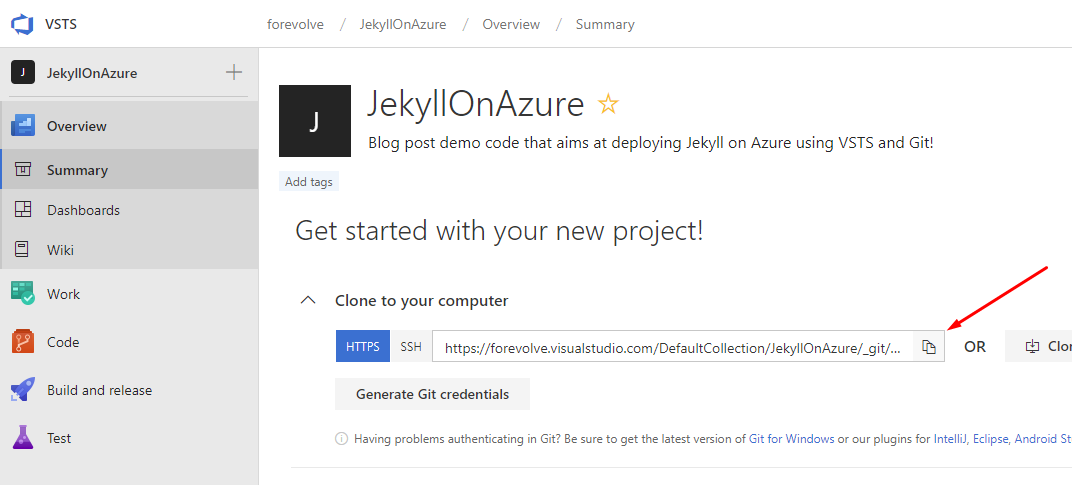
If not, that same link is available in the “Code” section of your project. There is also the git commands to push your repo there; if you feel like copy/pasting it.
Personally, I am a big fan of Git Extensions. It adds options to Windows Explorer context menus, and there is a Visual Studio plugin to launch it from there as well!

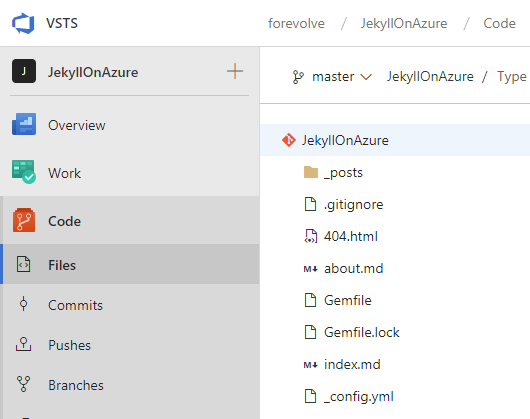
Once pushed, VSTS should contain your code (after you refresh the page).
Infrastructure as code
If you want to automatically create the build definition when you push your code, you can jump to Infrastructure as code and use the provided YAML code.
Next step
It is now time to move to the next article: Part 1: The VSTS Build.