How to deploy and host a Jekyll website in Azure blob storage using a VSTS continuous deployment pipeline
Part 2: Create Azure Blob Storage, and configure static website

Lets recap: we have a Jekyll website saved in VSTS/Git, with a build that starts automatically each time someone pushes code to the master branch.
From there we need to deploy our website in the cloud! However before automating that, we need to create some resources in Azure. To do so, let’s use the Azure portal.
The Azure Portal is easy to use, and I am not even sure if the other tools support the
Static website (preview)option yet.
If you don’t have an Azure account, you can start a free trial here: https://azure.microsoft.com/en-us/free/.
This article is very brief and was extracted on its own only to remove some clutter from Part 3: The VSTS Release.
Table of content
If you are beginning to read the article series, I recommend that you start by the introduction and prerequisites, to make sure you read the plan first then get all the prerequisites set up right.
| Articles in this series |
|---|
|
Introduction and prerequisites
In this article, we draw the plan and start the project. We will create a Jekyll website and create a VSTS project with a Git repository.
|
|
Part 1: The VSTS Build
In this article, we create the Jekyll build definition in VSTS.
|
|
Part 2: Create Azure Blob Storage, and configure static website
You are here
In this article, we create an Azure Blob Storage and we configure it to be ready for the deployment phase.
|
|
Part 3: The VSTS Release
In this article, we create the release definition. At the end, every code push in `master` will be deployed automatically.
|
|
Part 4: Configuring a Content Delivery Network (CDN)
Coming soon
In this article, we create the final piece of the puzzle, the way to access our Jekyll website using a custom domain over HTTPS. We also update the VSTS CD pipeline to account for this new addition.
|
|
Infrastructure as code
In this article, I give you the YAML code that you can use to automatically create the build definition by adding a `.vsts-ci.yml` file to your Jekyll website. This can replace "Part 1: The VSTS Build".
|
Create a resource group
Resource groups are an excellent way to keep your resources organized. I named mine JekyllOnAzure.
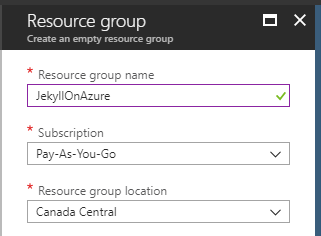
You can also create the resource group at the same time as the Storage Account if you prefer.
Create a Storage Account
We will use the blob storage account to store our files in the cloud (the build artifact: _site).
The storage account will also serve as the website host (or “server” if you prefer).
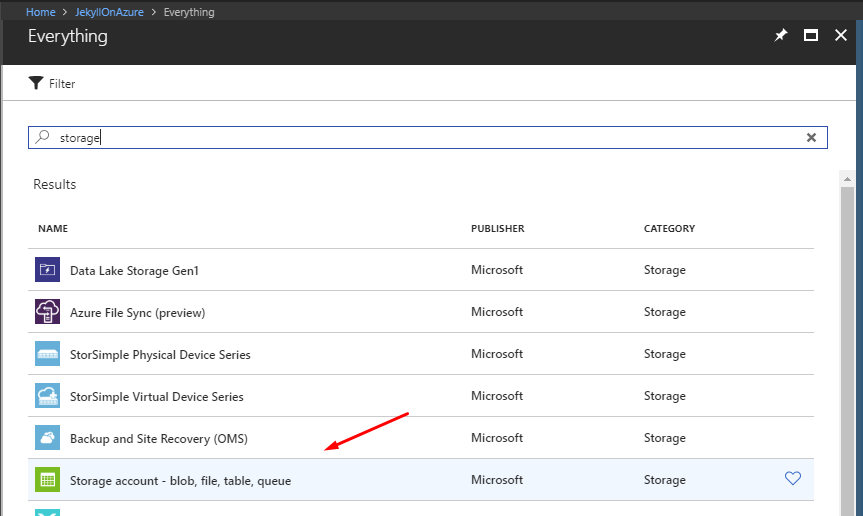
From the resource group (or somewhere else in the Azure portal):
- Click
Create resource. - Search for
storage - Select
Storage account - blob, file, table, queue - Click
Create
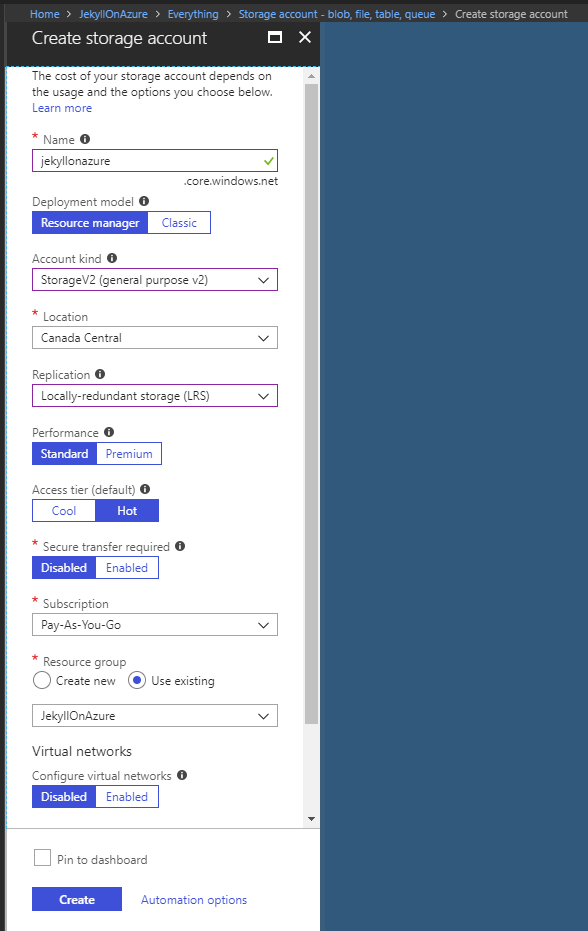
In the Create storage account blade, make sure you:
- Select
StorageV2 (general purpose v2) - Choose an adequate replication strategy for your website (I chose
LRSfor this demo since I don’t need redundancy). - Choose the right performance option (
Standardshould be fine for most website). - Choose your previously created resource group or create a new one
You can also enable Secure transfer required if you want to force HTTPS (this can be changed later). I recommend that you activate this option at some point.
Once Azure completes the creation of the Storage account: navigate to the new resource blade.
Configure the Storage Account
From the storage account you just created:
- Click on
Static website (preview) - Click
Enable - Enter
index.htmlas theIndex document name - Enter
404.htmlas theError document path. The404.htmlfile is created byJekyll new, if your 404 page is not that one, set your own custom one’s path here instead. - Click
Save
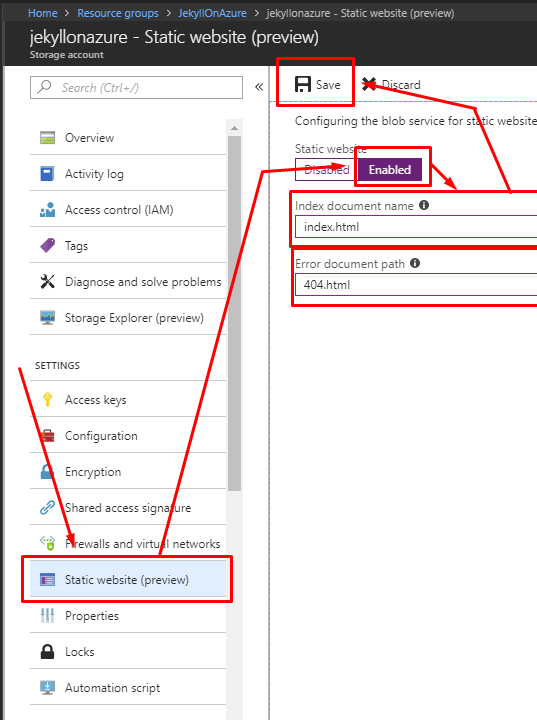
Note that, as of this writing, not all regions support the
static website (preview)option. I usedCanada (central).
At this point, Azure should have created a $web container in the Storage Account.
That’s where your website files should be uploaded.
Testing the setup
Using Azure Storage Explorer or the Storage Explorer (preview) blade, in the $web blob container, let’s upload an index.html file to test this out.
Azure Storage Explorer is a helpful tool that I recommend you to install if you plan on using Azure Storage.
There is also a Visual Studio Code plugin, for you VSCode enthusiasts out there, named: Azure Storage that does more or less the same thing from inside VS Code.
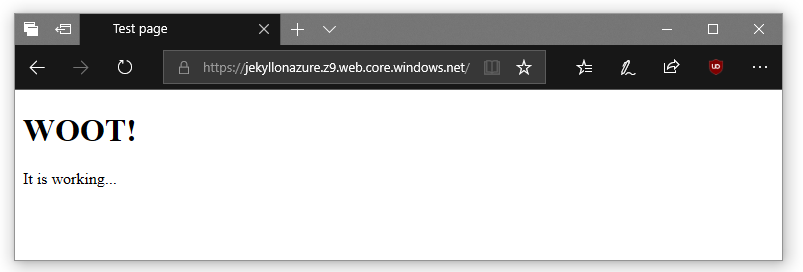
Here is the code of the index.html page I uploaded:
<!DOCTYPE html>
<html>

<head>
    <meta charset="utf-8" />
    <meta http-equiv="X-UA-Compatible" content="IE=edge">
    <title>Test page</title>
    <meta name="viewport" content="width=device-width, initial-scale=1">
</head>

<body>
    <h1>WOOT!</h1>
    <p>It is working...</p>
</body>

</html>
Once the file is uploaded, navigate to your Primary endpoint (you can find the URI in the Static website (preview) blade), and voilà, you should see your test page:
Next step
It is now time to move to the next article: Part 3: The VSTS Release.