How to create an OData reporting service in ASP.NET 4.5

Before starting, I will assume that:
- You know what OData is (at least a bit).
- Have basic knowledge of Visual Studio, NuGet, ASP.NET, MVC5 and C#
What we will do is:
- Create a project
- Install dependencies
- Create some files and write some code
- Create a basic Model
- Create a basic Controller
- Create OData configuration
- Consume our OData service in a browser
- Some explanations
- Consume our OData service in Excel 2016
The project
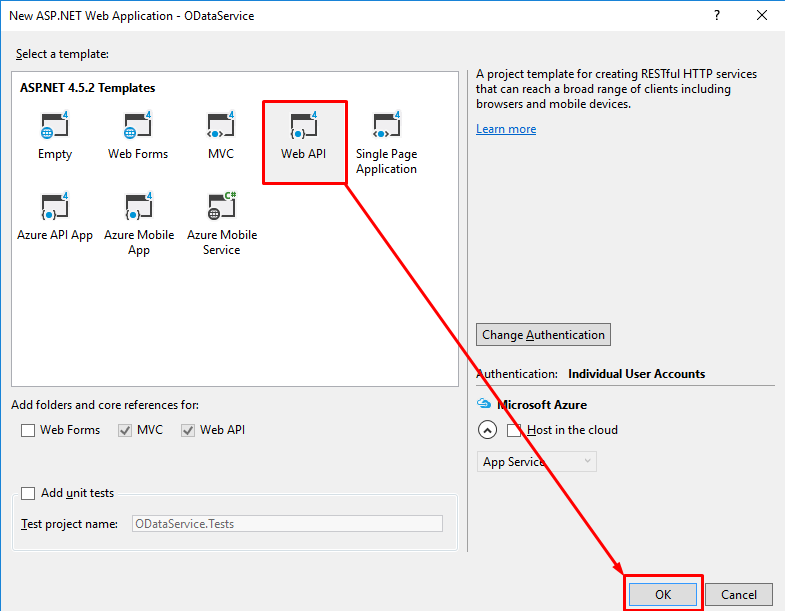
First, we need a project to work in. If you already have a project that you want to add OData support to, feel free to use it. For the sake of the current article, i will create a new ASP.NET WebApi project using .NET 4.5.2:

Installing dependencies
Now that we have a project to work in, we need 2 packages, Microsoft.AspNet.OData and Microsoft.AspNet.WebApi. Since we based our project on the WebApi template we dont need Microsoft.AspNet.WebApi but, if you started with an existing ASP.NET MVC project you will need to install both packages.
For WebApi project, in the Package Manager Console, run the following command:
Install-Package Microsoft.AspNet.OData
For MVC project, in the Package Manager Console, run the following commands:
Install-Package Microsoft.AspNet.OData
Install-Package Microsoft.AspNet.WebApi
Ninject
If you are like me and like to use Ninject, you will need to install these 2 packages to add Ninject DI support in your OData controllers:
Install-Package Ninject.Web.WebApi
Install-Package Ninject.Web.WebApi.WebHost
Using Ninject is beyond the scope of the current article. This is just a quick tip.
Write some code
In this part we will do the following:
- Create a Model
- Create a Controller for that Model
- Glue this all up and setup our OData endpoint
I will explain the important parts afterward.
Model
Lets first create our simple model, as follow:
namespace ODataService.Models
{
    public class MyODataModel
    {
        public int Id { get; set; }
        public string Description { get; set; }
    }
}
Controller
Now that we have a Model, we will add the following simple controller:
using ODataService.Models;
using System.Collections.Generic;
using System.Linq;
using System.Web.Http;
using System.Web.OData;

namespace ODataService.Controllers
{
    public class MyODataModelController : ODataController
    {
        #region Some dummy data

        private static List<MyODataModel> InternalDataStore;
        static MyODataModelController()
        {
            InternalDataStore = new List<MyODataModel>();
            for (int i = 0; i < 10; i++)
            {
                var id = i + 1;
                InternalDataStore.Add(new MyODataModel
                {
                    Id = id,
                    Description = string.Format("MyODataModel {0}", id)
                });
            }
        }

        #endregion

        [EnableQuery]
        public virtual IHttpActionResult Get()
        {
            return Ok(InternalDataStore);
        }

        [EnableQuery]
        public virtual IHttpActionResult Get([FromODataUri] int key)
        {
            var record = InternalDataStore.FirstOrDefault(r => r.Id == key);
            if (record == null)
            {
                return NotFound();
            }
            return Ok(record);
        }
    }
}
Configuring OData
We now have all of our components in place. Depending on how you started, the next step will differ a bit.
MVC project
If you started from a MVC project, we will create a file named ODataConfig.cs in our App_Start directory. You could also name it WebApiConfig.cs if you prefer.
How to choose (my opinion) ?
If you plan on creating WebApi controllers, other than OData, it might be a good idea to name the file
WebApiConfig.csand use the WebApi code instead. If you only want OData, i’d go forODataConfig.cssince it describe what it does pretty well.
Your config file should look like this:
using ODataService.Models;
using System.Web.Http;
using System.Web.OData.Builder;
using System.Web.OData.Extensions;

namespace ODataService
{
    public class ODataConfig
    {
        public static void Register(HttpConfiguration config)
        {
            // Web API routes
            config.MapHttpAttributeRoutes();

            // OData configs
            var builder = new ODataConventionModelBuilder();
            builder.EntitySet<MyODataModel>("MyODataModel");

            // Map OData routes
            config.MapODataServiceRoute(
                routeName: "ODataRoute",
                routePrefix: "odata",
                model: builder.GetEdmModel());
        }
    }
}
The final rigging touch
We also need to tell ASP.NET what to do with our ODataConfig.cs file. To do so, we will update the global.asax.cs file and add the following line to it:
GlobalConfiguration.Configure(ODataConfig.Register);
The complete file look like this:
using System.Web.Http;
using System.Web.Mvc;
using System.Web.Optimization;
using System.Web.Routing;

namespace ODataService
{
    public class WebApiApplication : System.Web.HttpApplication
    {
        protected void Application_Start()
        {
            AreaRegistration.RegisterAllAreas();
            GlobalConfiguration.Configure(ODataConfig.Register);
            FilterConfig.RegisterGlobalFilters(GlobalFilters.Filters);
            RouteConfig.RegisterRoutes(RouteTable.Routes);
            BundleConfig.RegisterBundles(BundleTable.Bundles);
        }
    }
}
WebApi project
If you started from a WebApi project, we will update the WebApiConfig.cs file to the following:
using System.Web.Http;
using Microsoft.Owin.Security.OAuth;
using System.Web.OData.Builder;
using ODataService.Models;
using System.Web.OData.Extensions;

namespace ODataService
{
    public static class WebApiConfig
    {
        public static void Register(HttpConfiguration config)
        {
            // Web API configuration and services
            // Configure Web API to use only bearer token authentication.
            config.SuppressDefaultHostAuthentication();
            config.Filters.Add(new HostAuthenticationFilter(OAuthDefaults.AuthenticationType));

            // Web API routes
            config.MapHttpAttributeRoutes();

            // OData configs
            var builder = new ODataConventionModelBuilder();
            builder.EntitySet<MyODataModel>("MyODataModel");

            // Map OData routes
            config.MapODataServiceRoute(
                routeName: "ODataRoute",
                routePrefix: "odata",
                model: builder.GetEdmModel());

            // Add default route
            config.Routes.MapHttpRoute(
                name: "DefaultApi",
                routeTemplate: "api/{controller}/{id}",
                defaults: new { id = RouteParameter.Optional }
            );
        }
    }
}
Consuming our service in a browser
Before going further, lets try this up by starting our project (ctrl+F5, F5, ctrl+shift+B or click the little green play button).
By navigating to /odata, you should see something like this:

I use the JSON Formatter Chrome plugin to format my JSON.
This is our “OData entry point”, it describe what services are available as well as our Model (navigate to /odata/$metadata).
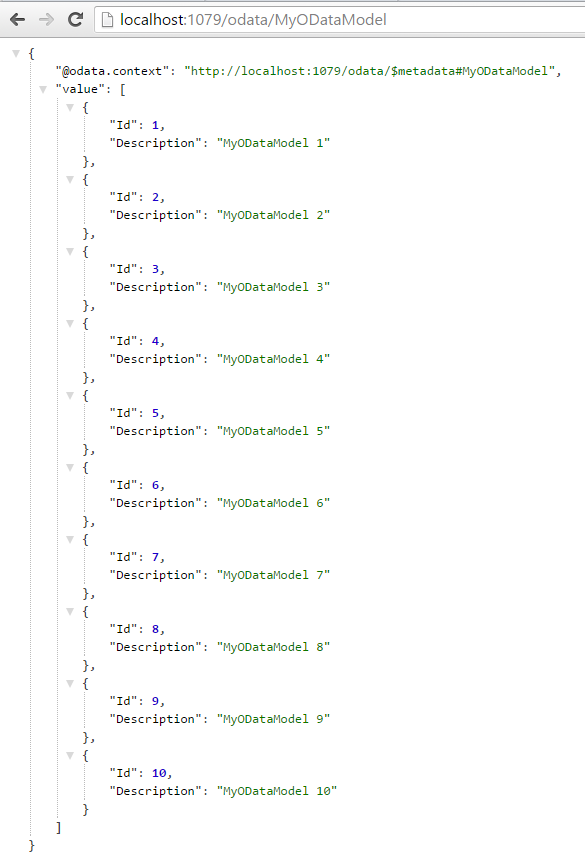
By navigating to /odata/MyODataModel, you should see something similar to this:
By navigating to /odata/MyODataModel(5), where 5 is the key parameter, you should see something similar to this:

Explanations
Controller
EnableQueryAttribute
The [EnableQuery] attribute placed on controller’s action:
enable querying using the OData query syntax.
Basically, this is the key to query your OData services. For more info see EnableQueryAttribute Class.
FromODataUriAttribute
The [FromODataUri] attribute allows us to:
bind URI parameters using OData conventions.
For more info see FromODataUriAttribute Class.
Configuration
Both MVC ODataConfig.cs and WebAPI WebApiConfig.cs files follow the same rules.
Routes
The order is important and the OData routes must be registered after the Web API routes, represented by the following line: config.MapHttpAttributeRoutes();.
EDM Model builder
There is many ways to build the EDM model. We used the “by convention” method and we were assisted by the ODataConventionModelBuilder class.
Since i built my EDM model using conventions, my Id property was automatically configured as the primary key.
We could use the builder variable to add more entities to our model, complex types, etc.
// OData configs
var builder = new ODataConventionModelBuilder();
builder.EntitySet<MyODataModel>("MyODataModel");
// TODO: add more entities here
Where:
<MyODataModel>is our model type."MyODataModel"is the name of our controller, without the “Controller” suffix.
Removing the “magic strings”
What I like to do in scenarios like this, that is more “refactoring-friendly”, is to create a little generic method that use the type and remove the suffix instead of “magic strings”.
I don’t like magic strings that much and i believe they create harder to maintain programs. On the other hand, I do love the new nameof operator (well that’s a topic for another day).
Helper method:
public static string GetControllerNameOf<TController>()
    where TController : ODataController
{
    return typeof(TController).Name.Replace("Controller", "");
}
We can now update the line:
builder.EntitySet<MyODataModel>("MyODataModel");
To that more “refactor-friendly” line:
builder.EntitySet<MyODataModel>(GetControllerNameOf<MyODataModelController>());
EDM route registration
In the following code bloc, we create our OData route.
// Map OData routes
config.MapODataServiceRoute(
    routeName: "ODataRoute",
    routePrefix: "odata",
    model: builder.GetEdmModel());
I like the “odata” prefix, but depending on projects requirements, you can change it to whatever you want and event omit it completely. To have no prefix, set the routePrefix value to an empty string.
And finally, the builder to the heavy lifting for us, by creating the IEdmModel for us. Well we did contribute a bit ;).
Consuming our OData service in Excel 2016
We can now connect our queryable OData service to Excel or to another client. Its JSON after all, the limits are where we put them!
Excel (quick how to)
In a new Excel 2016 document.
1. Create a datasource
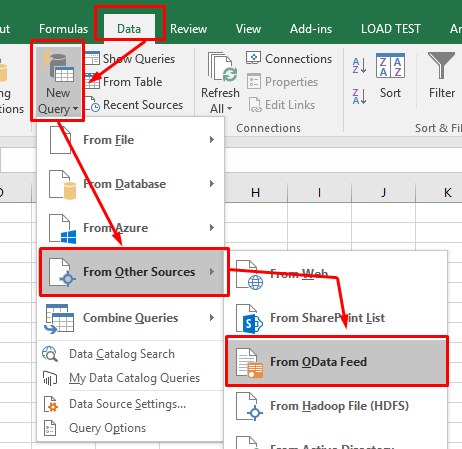
2. Paste the OData service URL

3. Play with the Query Editor
Play with the Query Editor…
4. Close & Load
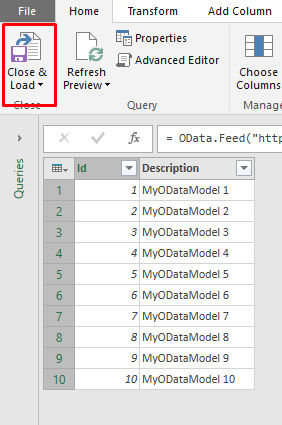
And voila!
We now have a data table in our spreadsheet that we can refresh. We can even edit the query, remove columns, filter the set, change the data source, etc.

Next step
Now that we are all set, you only have to replace your static code with a database.
And maybe add more services as well. :)
Happy coding!
Project source code is available at: https://github.com/Carl-Hugo/ODataService