Design Patterns: Asp.Net Core Web API, services, and repositories
Part 8: Azure table storage and the data model
So far, we implemented the clan’s feature, using a static in-memory storage.
We also implemented most of the ninja feature, excluding the data-access logic, where we stopped at the INinjaRepository level.
In this article I will introduce you to Microsoft Azure Table Storage and we will create our data model. This article will be brief.
The series (shared section)
In the series, we will create an Asp.Net Core 2.0 Web API, and we will focus on the following major concerns:
- The web part; the HTTP request and response handling.
- The business logic; the domain.
- The data access logic; reading and writing data.
During the article, I will try to include the thinking process behind the code.
Technology-wise, we will use Asp.Net Core, Azure Table Storage and ForEvolve Framework to build the Web API.
To use the ForEvolve Framework (or let’s say toolbox), you will need to install packages from a custom NuGet feed.
If you dont know How to use a custom NuGet feed in Visual Studio 2017, feel free to take a look at this article.
If you do, the ForEvolve NuGet feed URI is https://www.myget.org/F/forevolve/api/v3/index.json.
We will also use XUnit and Moq for both unit and integration testing.
Table of content
I will update the table of content as the series progress.
“Prerequisites”
In the series, I will cover multiple subjects, more or less in details, and I will assume that you have a little idea about what a Web API is, that you know C# and that you already have a development environment setup (i.e.: Visual Studio, Asp.Net Core, etc.).
The goal
At the end of this article series, you should be able to program an Asp.Net Core Web API in a structured and testable way using the explained techniques (design patterns). These design patterns offer a clean way to follow the Single Responsibility Principle.
Since design patterns are language-agnostic, you can use them in different applications and languages. In an Angular application, you will most likely use Dependency Injection for example.
This is one of the beauties of design patterns; they are tools to be used, not feared!
Asp.Net Core 2.0
At the time of the writing, Asp.Net Core 2.0 was still in prerelease, and I updated the code samples to use the release version.
You will need the .NET Core 2.0.0 SDK and Visual Studio 2017 update 3 or the IDE/code editor of your choosing.
Azure Table Storage
I will start by quoting Microsoft on this one:
Azure Table storage is a service that stores structured NoSQL data in the cloud, providing a key/attribute store with a schemaless design. Because Table storage is schemaless, it is easy to adapt your data as your application evolve. Access to Table storage data is fast and cost-effective for many types of applications and is typically lower in cost than traditional SQL for similar volumes of data.
In my word, an Azure Table is like a big SQL table with a composite key (PartitionKey + RowKey), but instead of user-defined columns (a schema), columns are variable, based on the entity you want to store in your table.
More on that, it is cheap and fast. In my humble opinion, this is a great way to store data.
The Storage Account
To get started:
- You will need an Azure subscription (if you do not already have one, it requires a credit card, but MS will give you free credits. I also doubt that our Ninja API will cost you any money, no matter what - Table storage is cheap).
- You will need to create an Azure Storage in your account
Create a subscription
To create a sub, go to https://azure.microsoft.com and follow the instructions. This should be fairly easy.
If you already have one, great!
Create Azure Storage
Once you have an Azure account, create a new Storage Account resource.
Managing your Azure resources is out of the scope of this article, so I will leave you on your own for a little while.
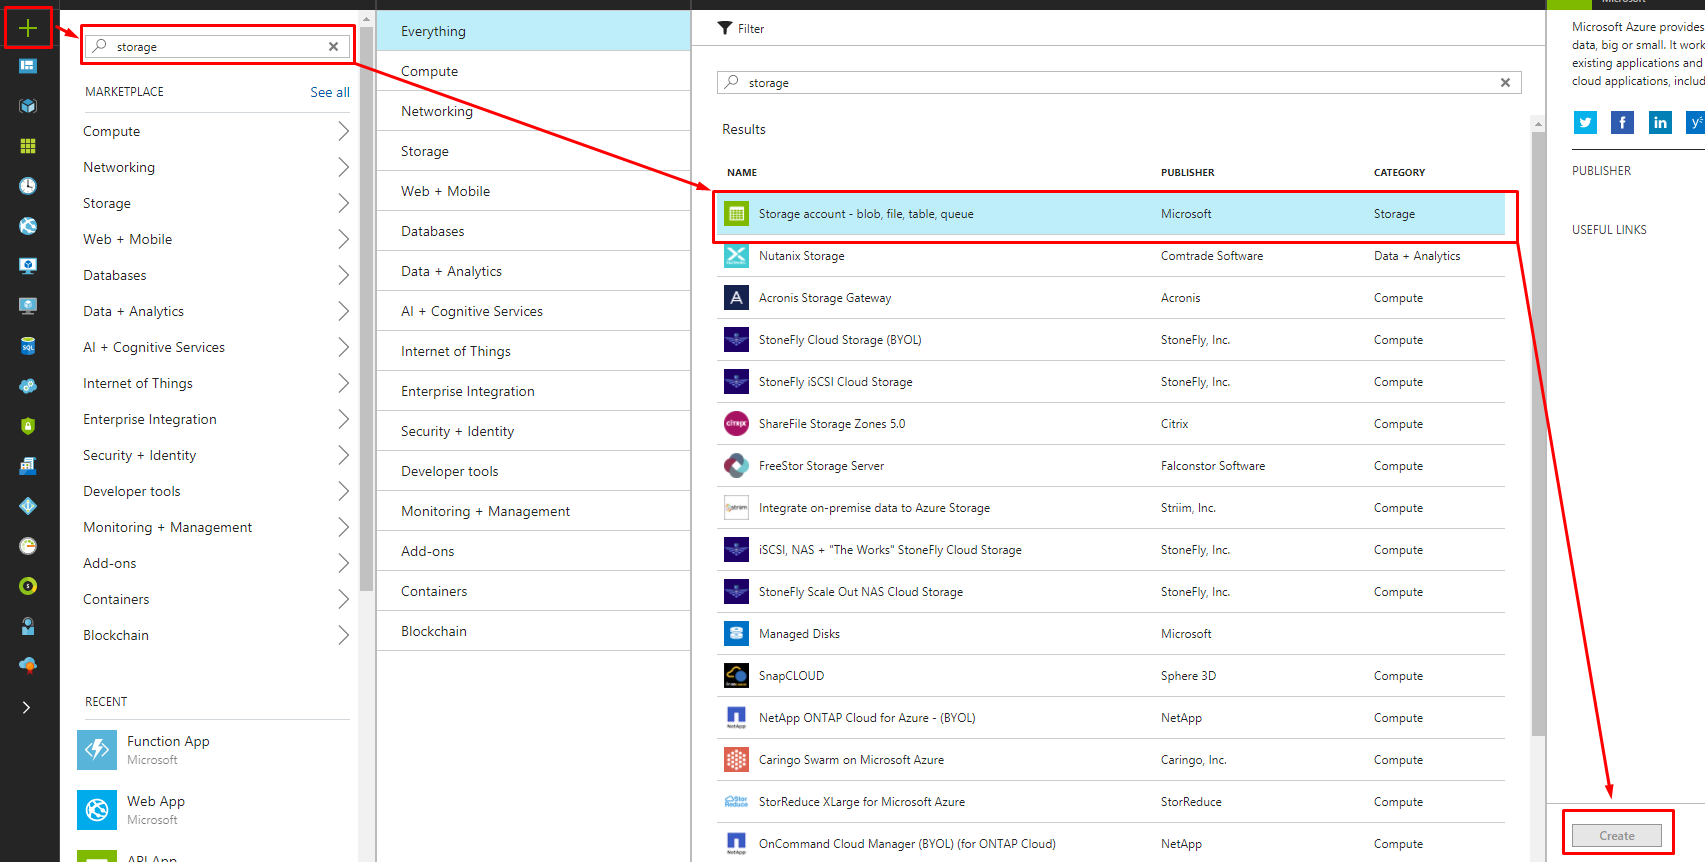
If you are clueless, feel free to start here: Create a storage account
But basically, you click the green + sign, search for storage, select Storage account - blob, file, table, queue and click Create.
Once this is done, you need to fill in the form presented to you.
Tip
In the form, use the little “information icons” if you are not sure. Microsoft made our life easier there…
Create an Azure Storage Table
We do not need to create a Table; it will be created automatically later.
Data Model
As I previously stated, our data source will be an Azure Table Storage, and we will use the Azure SDK indirectly through ForEvolve.Azure.
Azure Table (SDK) Rule #1
Our entity classes (the objects that we want to store in an Azure Table) must implement
ITableEntity.
That said, we need to create a new class that will represent the persisted Ninja’s data.
Let’s call the ninja’s data representation class NinjaEntity.
To make it easy, we will simply inherit from TableEntity instead of manually implementing ITableEntity.
Here is the NinjaEntity class:
namespace ForEvolve.Blog.Samples.NinjaApi.Models
{
    public class NinjaEntity : TableEntity
    {
        public string Name { get; set; }
        public int Level { get; set; }
    }
}
Compared to the Ninja class, there are a few missing properties, right?
namespace ForEvolve.Blog.Samples.NinjaApi.Models
{
    public class Ninja
    {
        public string Key { get; set; }
        public Clan Clan { get; set; }
        public string Name { get; set; }
        public int Level { get; set; }
    }
}
Actually, we are fine, ITableEntity has the following two required properties.
public string PartitionKey { get; set; }
public string RowKey { get; set; }
From the relational point of view, an Azure Table has a composite primary key, combining PartitionKey and RowKey.
There is more to it than that, but for this article, it will be enough.
To skip the database modeling part, we will use the clan name as the PartitionKey and the ninja key as the RowKey.
To be able to save our ninja in the Azure Table Storage, we will map Ninja objects to NinjaEntity objects as follow:
Ninja.Clan.NametoNinjaEntity.PartitionKeyNinja.KeytoNinjaEntity.RowKeyNinja.NametoNinjaEntity.NameNinja.LeveltoNinjaEntity.Level
Tools
To keep the external dependencies low, we will code the mapping manually. In a real life project I would recommend the use of a library like AutoMapper. AutoMapper is a great tool that allows copying one object into another (and much more).
The end of this article
This was a short article, but once again I split an article into multiple parts to make it clearer and easier to read; it was way too long, trust me.
What have we covered in this article?
In this article, I introduced Microsoft Azure Table Storage and we created the Ninja’s data model based on that knowledge.
What’s next?
In the next article, we will implement a little mapping system to help us map domain entities to data entities and vice versa.
Last word (shared section)
Table of content
Resources
Some additional resources used during the article (or not).
Articles & concepts
- Bounded Context
- Dependency Injection
- From STUPID to SOLID Code!
- Mocks Aren’t Stubs
- Testing and debugging ASP.NET Core
Tools & technologies
Code samples
Special thanks
I’d like to finish with special thanks to Emmanuel Genest who took the time to read my drafts and give me comments from a reader point of view.